Sunday, June 23, 2013

Phonemic Awareness Activities

Last week I was looking to purchase a "blending cards" and was disappointed to find that to purchase a new one, it'd be roughly $40-50 (just for one set).

$40-50 times 5 kids at my reading table = NOT GUNNA HAPPEN!

Luckily, I came across an awesome blog that had them for free! (Not only did they have the cards I was looking for, but there are a TON of really good resources for teaching phonemic awareness). Needless to say, I ran through some colored ink and card stock pretty fast. Anyways, head on over to Make, Take, Teach to snag the downloads for these cards. I did print my cards like a traffic light...the first sounds on green card stock, the vowel sounds on yellow, and the last sound on pink/red. 

Now, I also was looking to purchase a "blending board" and was frustrated to find they too were pretty expensive. You can click on the following links if you want to spend between $35-50 IMSE and RLAC. That too was not gunna happen! Make, Take, Teach has directions on how to make your own...but that was too much work for me!

I located a magnetic board that I purchased from JoAnn Fabrics a while back...(Sorry for the horrible pics!)


I went to Staples and purchased three plastic business card holders ($1.99 each) and six magnets ($2.99).


I took some Gorilla Glue and glued the magnets to the back of the business card holders. I glued two magnets on each holder and let them dry for a few minutes.


When the magnets were in place, I was able to put them on the board...


Another cool thing about this board is that there are holes at the top...If I decide to punch holes in the top of the cards I can also flip them over the board!

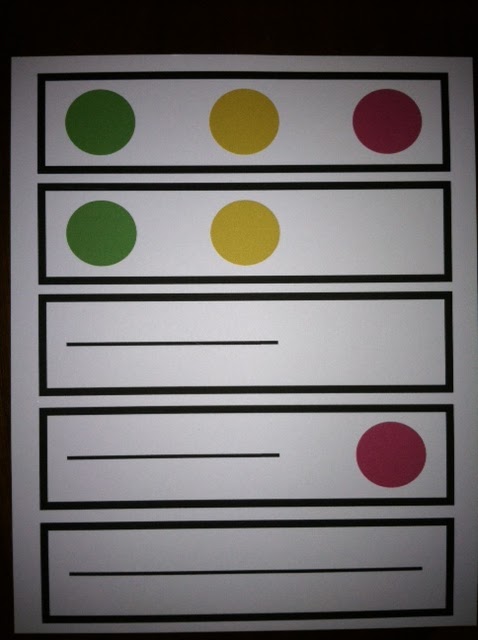
I'm sure you've worked with kids who've had difficulty blending at least three phonemes. No matter how much I stretch each sound, /c/ /a/ /t/ sometimes it comes out like 'at' or 'tack'. Here's a little freebie to help those kiddos...a little something I learned this past week when I was taking a reading class. (It's not as big as it looks in the pic below).


So let's say the word is "rag". Place the card in front of the child:

(1) Have them look at the first row. Every time they say a sound, have them tap their finger on a dot. Don't have them try to put the sounds back together! (/r/ /a/ /g/)

(2) Have them look at the second row. They are only going to say the first two sounds as they tap their finger on the dots. (/r/ /a/)

(3) Have them look at the third row. They are only going to blend the first two sounds as they drag their finger on the line. (/ra/)

(4) Have them look at the fourth row. They are going to blend the first two sounds as they drag their finger on the line and then tap the dot as they say the last sound. (/ra/ /g/)

(5) Have them blend the first two sounds (/ra/) and the last sound /g/ as they drag their finger on the line.

And there you have it! I think once the kids have this concept down, it would be helpful for them to look at the cards that are on the blending board as they tap out the sounds...Eventually, they could just tap on the table!

Friday, June 7, 2013

Organization Linky Party

I'm joining Ladybug's Teacher Files Organizational Linky Party this summer...It's been a while since I've joined one, but her's are usually the best! (I heart her labels).


I wish I had some monumental organizational pics to share with you, but I've packed up my classroom for the year and there's not too much to share with you. I was able to snap a few today that might be of interest...but I do promise that I will have some new book labels coming at you this summer, as my mom just retired and left me with more books than one person could ever need. Translation: I've been hitting up every Target store in the Columbus area to stock up on new bins and shelving!

Quite possibly one of the greatest purchases ever...So good, I now have two of them! I bought this one a while back at Sam's Club and have used it as an art cart, math cart...and now, as exciting as this may be...a DIBELS cart! I have a labeled bin for every teacher in the building so when I progress monitor/benchmark I can just take the bin with me...Or I can wheel the entire cart!


I'm also pretty excited about my new shelf that I just scored from my mom. It fits all of my boxes that I use to keep materials for each vowel sound. I know the labels aren't too jazzy right now, but that's on the list as a summer project. I purchased the colored bins at Costco (five for $18.99) and I heart them. As for the bins on the bottom shelf, I am going to use those to keep all of my important RTI docs...They too, need jazzy labels.


Nothing exciting with my next two pics, except for the fact that I cleaned out my cabinet and threw away things that I haven't touched in years...Which made room for all of my leveled fluency passages that I will be using throughout the year!


Thursday, June 6, 2013

The Amazing Race (Literacy Version)

A few weeks ago my teaching colleague had a great idea to create an "Amazing Race" for our reading intervention students. She's an avid watcher of the TV show and helped me get some ideas to make this come to life! We decided to pick five big ideas we've worked on this year with our second graders, which includes, determining author's purpose, reading fluency, characteristics of non-fiction, retelling, and parts of speech. Since we are at a STEM school, we decided to throw in some engineering and math tasks too! We started small this year to see how it goes, but would love to make it a school-wide end-of-the-year activity. 

Here's the pdf, but if you'd like to tweak it for your kiddos, I'd be more than happy to send you the editable "Pages" (for Mac) template.  
I tried to color-coordinate each reading task so that it was easy to prepare. Instead of using yellow envelopes for clues, I used manila folders. I placed the directions on the outside and the materials needed in the inside (and laminated). Since there are roughly six to seven kids in each reading group I created four of everything (figuring that they'd be working with a buddy). Here's a picture of what it looks like when it's put together:


So when I started working on this, I had to bribe some of my colleagues to participate...I only needed five "stations" or "legs" so it wasn't too hard to get the help. Although it's pretty lengthy, here's what we came up with... 

AUTHOR'S PURPOSE
Students started out in the Reading Intervention Room where they read a selection to determine the author's purpose. (For this, I found a persuasive letter that I retyped). Depending upon their answer, they had a clue to tell them where to go next. (These clues are located in the "Tracking Sheet"). The next clue was located in the gymnasium which told them to find a 1st Grade teacher with an odd classroom number.

TIMED FLUENCY READ
Once they located the correct teacher, they received a reading passage and a timer. One student had to be the reader and one was the timer. Their goal was to increase the number of words per minute for three trials. If students were able to do this correctly, they were given a simple engineering task. If they weren't able to do this correctly, they were given a more complex engineering task. Upon completion, that teacher would provide them with the next clue!


CHARACTERISTICS OF NON-FICTION
Students were given a non-fiction story (pulled from Reading A-Z) to read and be able to list four characteristics of non-fiction. Depending upon how many they were able to get correctly determined how many rulers they were given for the next task. Students had to measure the length of the hallway...so the more rulers, the better! Once students successfully completed the hallway measurement task, they were given a clue to find a teacher with only one short vowel sound in her name.


RETELLING A STORY
Students worked together to read a story (also pulled from Reading A-Z). Students had to identify the beginning, middle, and end...while making sure they also addressed the characters, setting, and plot. Students received 1-3 clues for their next task based upon how well they were able to retell the story. 

NOUNS, VERBS, AND ADJECTIVES
Students read a passage and had to sort the nouns, verbs, and adjectives. Once the teacher ok'd their work...They were finished!