Showing posts with label Linky Party. Show all posts

Friday, June 7, 2013

Organization Linky Party

I'm joining Ladybug's Teacher Files Organizational Linky Party this summer...It's been a while since I've joined one, but her's are usually the best! (I heart her labels).


I wish I had some monumental organizational pics to share with you, but I've packed up my classroom for the year and there's not too much to share with you. I was able to snap a few today that might be of interest...but I do promise that I will have some new book labels coming at you this summer, as my mom just retired and left me with more books than one person could ever need. Translation: I've been hitting up every Target store in the Columbus area to stock up on new bins and shelving!

Quite possibly one of the greatest purchases ever...So good, I now have two of them! I bought this one a while back at Sam's Club and have used it as an art cart, math cart...and now, as exciting as this may be...a DIBELS cart! I have a labeled bin for every teacher in the building so when I progress monitor/benchmark I can just take the bin with me...Or I can wheel the entire cart!


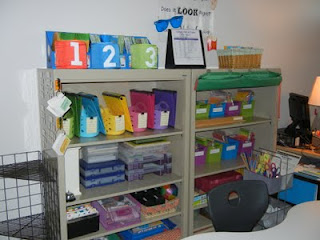
I'm also pretty excited about my new shelf that I just scored from my mom. It fits all of my boxes that I use to keep materials for each vowel sound. I know the labels aren't too jazzy right now, but that's on the list as a summer project. I purchased the colored bins at Costco (five for $18.99) and I heart them. As for the bins on the bottom shelf, I am going to use those to keep all of my important RTI docs...They too, need jazzy labels.


Nothing exciting with my next two pics, except for the fact that I cleaned out my cabinet and threw away things that I haven't touched in years...Which made room for all of my leveled fluency passages that I will be using throughout the year!


Monday, April 29, 2013

Instagram (Teacher Talk Tuesday)

We finally did it. (That's Katie speaking of course). 


You can find us on Instagram. I'm going to go ahead and blame Amanda for getting me started. I swore I'd never use it...and well, she goes and has a linky party with What the Teacher Wants and Apples and ABC's...and now I'm hooked. I'm sure Steve is going to jump on this quickly (insert sarcasm of course) but for the time being you can catch a glimpse of what my reading intervention room looks like...mainly just a bunch of bins filled with books. 

Be sure to follow us on Instagram (readingresourcedotnet) and head over to Amanda's blog to link up! 

Wednesday, August 1, 2012

Organization Linky Party

Typically I'm uninterested in link parties, but when I saw it was an "organizational" party from my dear pal Amanda, I couldn't resist!
You should probably head over and check out Amanda if you haven't already!
I went into school today and was bummed to see that my new room STILL hasn't been cleaned. Translation: I'm going to have to throw some old classroom pics your way! You may recognize them from my pages over at ReadingResource and older posts on this blog...I promise I'll get new pictures up this year when my room is ready. But for now, here are my favorite things to organize.

My colleagues like to joke about my undying love for my guided reading table (and all the shelves that surround it) saying it's my first born child. Well, it's true!

This was my table a couple years ago...


I believe that a well-organized small-group area that has all materials where they're needed allows for effective instruction. I keep my leveled books in the purple, blue, and green bins on the black shelf. The pic below shows a closer look at them. A few years back, I revamped the labels...You can print them off my clicking on the links below. (Use with Avery 8163 labels).


Guided Reading Labels #1 and Guided Reading Labels #2
This was my table last year...Well, a closer look at the shelves behind it I should say. I was fortunate to have two large shelves behind where I sit. 


Last year I had five different color-coded reading groups. Each group was designated a specific color (green, teal, yellow, pink, and purple). On the left side of the shelf, you can see the colored bins, as well as color-coded binders. In the bins I kept all of the materials for that specific group and in the binders I wrote down my lessons for each group. 


I printed the following template on card stock, laminated them, clipped them on the front of the basket, and wrote each group members' name with a dry-erase marker. That way when I change groups (which I do very often) I can easily rewrite the new names without having to make new tags!


In another location of the classroom where the children can easily access the bins, the same colored bins are used for placing books, games, magnetic letters, etc. taught in the small-group setting that those students can later use during literacy centers.


As you probably know, getting your classroom library set up can be one of the most difficult things to organize in your room!  When I first started this process, I "hired" a couple of my former students who knew my books well. We laid out all of the books by authors, illustrators, and topics. (Because teaching my students how to select appropriate text is very important to me, I didn't want to level my books with a number or a letter). I was able to create a plethora of different bins. I invested in some sturdy bins and ended up purchasing more than I needed because I knew my library would continue to grow. 


Once I established the names for each bin, I created a picture to represent that bin. These were mostly found by Googling and using clip art (unfortunately, Scrappin' Doodles wasn't around at that time). I also invested in luggage tags from Container Store. Although they weren't cheap, they are very durable and can withstand my little kiddos. Each book that is in the bin has a corresponding picture on the outside. 


When you are needing to label student cubbies and mailboxes, I recommend using binder clips! I just printed off the names with my label maker and slapped them on the edge of the shelf. This was SO helpful when kids moved in and out throughout the school year...I could easily alphabetize the names and it didn't ruin my shelves!


I'm not sure who the genius was that thought it was a good idea to purchase teacher's desks WITHOUT any drawers! Solution: I purchase yet some more storage bins and sorted my junk into 12 drawers...that I of course labeled with my label maker! 


A few years ago the librarian was getting rid of her magazine boxes and I snatched them up for my own professional library! I have all my books organized by subject, which make it nice when Steve comes to "borrow" my stuff.


Well, that's it for now. I promise I will get some new mugs up here as soon as I get into my new classroom.